Like Noah building an arc, I built my irrigation system in one of the the wettest years in decades… Nevertheless, there were a number of heat waves which allowed me to thoroughly test the system. It performed flawlessly and I’m delighted to be able to share the design and what I’ve learned.
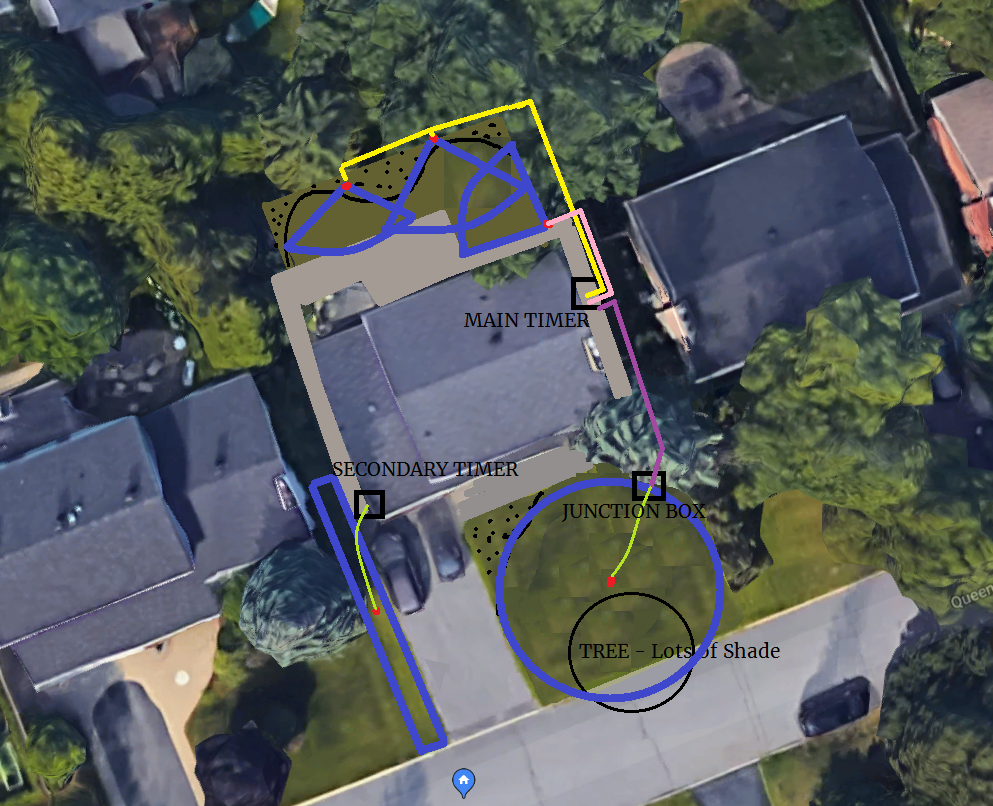
I should caveat my title by saying that I consider this system to be ultimate by virtue of it being simple to build, cost effective (~$300), and low maintenance, while also being very effective. Certainly if money is no object there are more complex systems worth considering. Here is an overview of the system, which I will explain in greater detail. I apologize for the low quality Microsoft Paint illustration.
TIMERS
The heart of my system is the Orbit Watermaster yard watering system. In my extensive research, this unit is by far the best hose-end sprinkler controller for the money (around $100). Check Amazon for the latest price. It effectively turns your standard hose faucet into a 4-station sprinkler system with 4 independent controls and 3 start times. No digging is required. The setup and programming is super simple and intuitive – much more so than the many competitors I’ve researched and tested.
The kit comes with two valves included. I recommend purchasing at least one additional valve right off the bat (fairly inexpensive) to allow you to use more zones. I like to leave one spot free if possible so I can maintain the use of my hose for spot watering etc, without having to add a Y connector. This system can easily be scaled up to 8 zones, or more, simply by adding a second timer. Here is an example of someone using multiple timers (credit: Curtis Stone). Check out his website here. He uses similar irrigation principles on a much larger scale for his highly successful urban farming business.

These valves are superior to standard irrigation valves for number of reasons:
- They are super easy to install;
- They are inexpensive;
- They require little to no maintenance; and
- They can be easily disassembled in the winter.
Traditional irrigation valves have some advantages as well, such as the ability to link to more sophisticated timers, however they do add significantly to the project’s complexity.
Orbit also offers
single hose timers, which I also use in my system (to help cover the front lawn). Both have performed flawlessly.
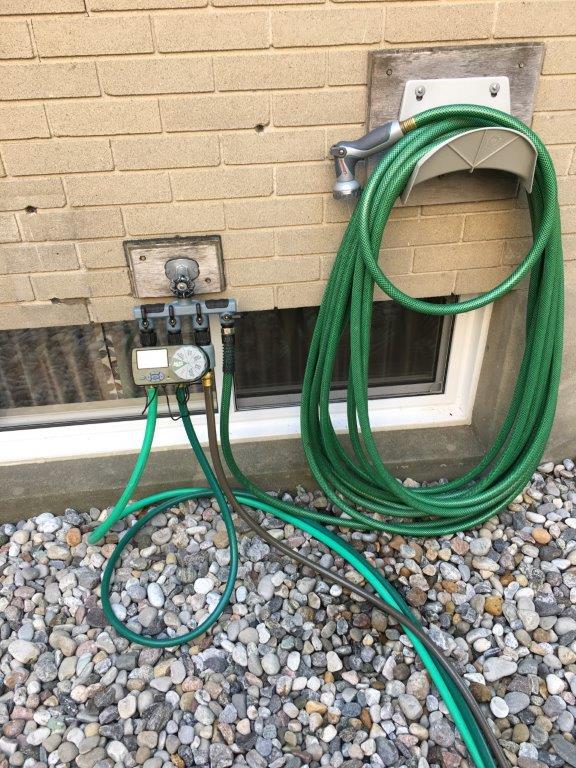
Here is another shot of my main timer, showing the hose coiled next to it. I plan on adding an irrigation box (see parts list) in the spring, along with some 4″PVC pipe under the interlock walkway on the side of the house to fully conceal the system. Given the layout of our property, this allows all hoses and Poly tubing to be buried without having to dig up any grass. You may not be quite so lucky, but if you plan carefully this may be possible.
Here is a shot of my secondary timer, which I have mounted in the garage. I find it much more ergonomic having a leader hose to raise the timer up. It makes making adjustments a lot easier. I mounted it on a scrap of 3/4″ plywood I had lying around. I added a Y connector and some quick connects (see parts list) so I could use the same hose if I want to do manual watering or wash the cars etc. Having a hose exiting under the garage door works fine. This secondary zone doesn’t get nearly as much sun as the rest of the property so I only use it during periods of intense heat or drought.
SPRINKLERS
There are many types of sprinkler heads available and the appropriate sprinkler heads should be used based on the irrigation needs of the landscape. For my system I chose to use mainly Rain Bird brass impact sprinklers (
check price on Amazon). I chose them for the following reasons:
1. They are super easy to install and adjust (from 20°-360°) with infinite pattern adjustment;
2. They are powerful (long range) – with a spray distance from 20 to 41′ radius. This gives you tremendous flexibility in designing your system – to minimize, or possibly eliminate, the need to dig trenches in your lawn;
3. Their brass, bronze, and stainless steel construction lasts longer than competitors;
4. They make very efficient use of water, even in high winds, as the water stays low to the ground; and
5. They rarely, if ever, get clogged because the water discharge hole is very large.
These are of course above ground sprinklers. It’s possible to use them in an underground application as well, but I didn’t feel like it was worth it to do this. It makes them harder to adjust, they don’t cover as much area because they sit lower, and they would be much more difficult to take down in the winter. In the backyard I have these on 12″ risers like the pic above (with 2′ metal stakes for stability). In the front yard I mounted one to a
spike for 360 degree coverage.
As a rule of thumb, for even coverage, you need to set your timers based on how wide the arc is that they are covering. Ie. If it takes 15 minutes to put down 1” of water for a 90 degree area of coverage if would take 1hr for the same head to cover 360 degrees. Keeping similar spraying angles on the same zone is important to get even coverage. In full sun areas, it’s important to have the spray from one sprinkler head make contact with the other heads to ensure there will be no dry spots. Fine-tune sprinkler spray positions and spray patterns to match your coverage area.
Check out this video on How to Adjust an Impact Sprinkler Head. I couldn’t find one from Rain Bird, but trust me, the Rain Bird sprinkler is better. I believe they hold the patent for this design.
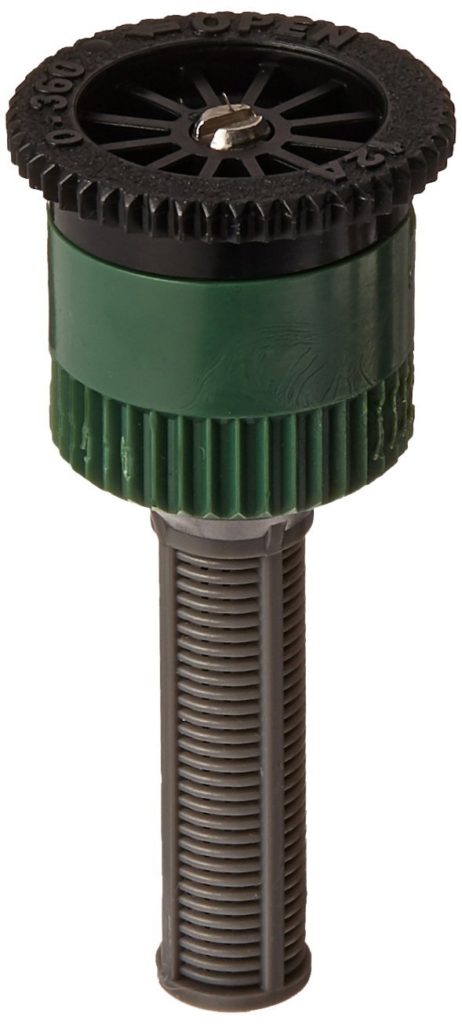
Adjustable Spray Heads
For small areas, I think these adjustable sprayers are the best. They only cost a few bucks and are easy to adjust when they’re elevated on a riser.
Hose End Sprinklers
For small areas that are hard to reach or isolated, hose end sprinklers are your best bet. For me, I have a small patch of lawn along my driveway that needs occasional watering. Having it on an automated timer is a must, especially when you’re out of town. Hose end sprinklers should be selected according to the size and shape of the area you need to cover, in order not to waste water. Most sprinklers aren’t very good at dealing with long and narrow areas. The sprinkler I recommend is in the Gardena Zoom Max. It’s not the cheapest one out there, but it’s able to water an unusually wide range of sizes and shapes with a consistent amount of water while still being durable.

SUPPLY LINES (PIPES AND HOSES)
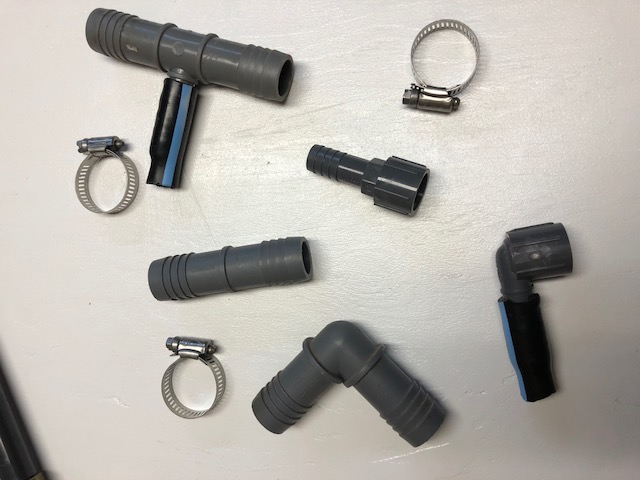
There are many different ways to run water supply lines for an irrigation system. My system uses flexible 1″ Poly (Polyethylene) pipes and garden hoses (see parts below). I think this is preferable over rigid PVC for a number of reasons:
- Polyethylene pipe is more flexible and performs better in cooler climates with freeze-thaw cycles.
- When used in conjunction with stainless steel hose clamps, they are adjustable. PVC is connected with glue, so if you make a mistake or want to change something, it’s more complicated.
Here is a great YouTube video explaining how to connect the 1″ poly pipe to the flexible sprinkler supply lines. 1″ is a good diameter for the main lines because the large diameter helps distribute the pressure more evenly. It’s best to limit the length of your 1/2′ supply lines for this reason. Similarly, if using hose, I recommend using 5/8′ or above instead of 1/2″.
After the pipe has been connected, turn on the water, open valves one at a time and flush until the water runs clear. Seal the fitting with tape to keep dirt out until the sprinklers are installed. Don’t back fill your trenches until your final checks are complete.
TIPS ON PLANNING YOUR DESIGN
1. Measure your lot. Using Google Maps or Google Earth is a helpful way to speed this up.
2. Divide up your lot in chunks based on the sprinkler heads you’ve chosen and water capacity of your house.
3. Use the terrain to your advantage. It’s much easier and less destructive to use the perimeter of your property to run your main supply lines – such as along a fence or through a garden. This can greatly minimize the need to dig up your lawn. Also, when installing sprinklers on risers (as I prefer to do) it allows them to be mainly concealed. An added benefit of not having sprinklers buried in the lawn is that it makes core aeration easier, as you don’t have to worry about running over your sprinkler heads.
4. Add inline auto-drains at all of the low-spots of your supply lines, such as this one from
Orbit, which only costs a few bucks. These are ingenious devices that automatically drain the water from the lines when not under pressure. This is especially beneficial in cool climates because it eliminates the need to blow out/ drain your lines at the end of the season. Check out this
video to see how they work.
How Much Water Pressure and Flow is Needed for a Sprinkler System?
The average water pressure for most homes is between 30 PSI and 50 PSI. Most sprinkler systems are designed to use pressures of around 30 PSI. If your pressure is substantially higher you my need to add a
regulator. You can measure the water pressure at your site with a
water gauge attached to an outdoor faucet. Make sure no other water is running in or outside the house when you’re testing.
The standard way to measure flow is with a 5 gallon bucket. Turn the faucet on all the way and time how long it takes to fill a 5 gallon bucket. Once you have this number you can calculate your gallons per minute (GPM). See this You Tube
video for a further explanation. As an example, if your home’s water capacity is 10 GPM and your nozzles use 3 GPM, you could place 3 heads per zone.
As a rule of thumb, for standard city water pressure, I would limit each zone to 1 impact head and 1 spray head. Impact heads use a lot of water and adding more than this to a zone will result in a noticeable decrease in range. In my experience having two impact heads on one zone is not advisable.
EQUIPMENT LIST
Three 2′ Metal stakes (to secure the sprinkler risers) – Best found at your local hardware store
1/2″ Tubing, 3/8″ works too (if it’s the flexible type). Get whatever is cheaper.
Torch for connecting Poly tubing
1″ assorted Poly fittings – Best found at your local hardware store
4″PVC conduit – Best found at your local hardware store
1/2″ threaded elbows – – Best found at your local hardware store
Six Hose Quick connects
A few short hoses (for connecting timer to your zones). PVC can be used as well, but is less ergonomic if you’re not putting your timer in an irrigation box.
CONCLUSION
In conclusion, an effective irrigation system doesn’t need to be highly complex and expensive. This system may not be glamorous, but it certainly is effective and versatile. I plan on adding a 5th zone this summer for the flower beds. Stay tuned for an article on that. Also, check out my article on
Lawn Watering for information on watering best practices. It doesn’t matter how good your system is if you’re not putting the right amount of water down at the right time. Good luck with your sprinkler system, I had a lot of fun with mine. Please comment below if you have any tips or suggestions.


Comments
I am grateful to you for sharing some of your ideas on how to install a DIY irrigation system in your home. You talked about the different types of sprinkler systems and how your choice should be dependent on your landscape needs. I’m actually planning on installing one in our garden or lawn soon, and I would definitely take heed of your advice once I shop around for the best sprinkler system. Thanks.
Good luck! Glad I could help.
With the Orbit WaterMaster – does it handle back flow or is another device required? Thanks.
Hi Kevin, thank you for sharing all this. You advise that you shouldn’t have more than one impact head on a zone, but your drawing shows a zone with 3 heads. Are they all spray heads? If so, how much range can you get with one spray head, and what about all three at the same time when the zone is on?
That zone has one impact and one spray head. The picture is a little hard to read. The spray head only covers a small area. If it was any larger I’d probably want to run a zone with just spray heads (no impact).
Cheers
What do you think the s.f. coverage is of one zone? I have about 24,000 sf to cover. Was hoping 8 zones would do that much? Hoping to get about 3000 s.f. per zone. Was thinking I could get 3 sprinklers per zone?
I have about 6 GPM flow and pressure of 56 psi.
Maybe a bit optimistic for impact sprinklers. Recommend testing your coverage. Suspect you might need more zones. Good luck!
What time do you usually maintain this system?
It doesn’t really require any maintenance. I take the timer and impact heads off for the winter, that’s it. Still going strong!
Excellent and useful content! Thanks guys. I came to know a lot.